5. 算法部署教程
本章节将向您展示:
如何通过 ultralytics 官方项目导出 YOLOv8 的 ONNX 模型;
通过 ONNX 自带的工具,获得优化后的计算图;
通过 Pulsar2 工具链量化&编译生成 AX620Q 适配的 NPU 模型;
将 GitHub 开源项目 ax_samples 中 YOLOv8 运行在社区开发板 爱芯派Zero 上。
5.1. YOLOv8
YOLOv8(You Only Look Once version 8)是由 Ultralytics 公司在2023年1月10日开源的 YOLOv5 的下一个重大更新版本。YOLOv8 继续沿用了 YOLO 系列模型的设计理念,即通过一次前向传播(You Only Look Once)来快速准确地识别图像中的物体。这个版本在 YOLOv5 的基础上进行了多项改进,以提升性能和灵活性,使其适用于图像分类、物体检测和实例分割等多种视觉任务。
5.2. ONNX 模型获得
5.2.1. 环境准备
默认已经基于 miniconda 搭建 ultralytics repo 必要的 python 环境。同时准备好导出 ONNX 模型必要的第三方依赖
pip install onnx
pip install onnxruntime
pip install onnxsim
完成 ultralytics 项目安装
pip install ultralytics
5.2.2. 导出 ONNX
下面的 python 脚本用于 下载、运行、导出 YOLOv8s 的 ONNX 模型
# Load a model
model = YOLO("yolov8s.pt")
model.info()

# Use the model
results = model("/home/qtang/images/ssd_dog.jpg")

# Save the results
results[0].save("yolov8s-result.jpg")

# Export to onnx with simplify
model.export(format='onnx', simplify=True)
执行过程如下
(ultralytics) qtang@gpux2:~/ultralytics$ python yolov8-test.py
YOLOv8s summary: 225 layers, 11166560 parameters, 0 gradients, 28.8 GFLOPs

image 1/1 /home/qtang/images/ssd_dog.jpg: 480x640 1 bicycle, 1 truck, 1 dog, 81.8ms
Speed: 4.6ms preprocess, 81.8ms inference, 336.5ms postprocess per image at shape (1, 3, 480, 640)
Ultralytics YOLOv8.1.15 🚀 Python-3.9.18 torch-2.2.0+cu121 CPU (AMD Ryzen Threadripper 3970X 32-Core Processor)

PyTorch: starting from 'yolov8s.pt' with input shape (1, 3, 640, 640) BCHW and output shape(s) (1, 84, 8400) (21.5 MB)

ONNX: starting export with onnx 1.15.0 opset 17...
ONNX: simplifying with onnxsim 0.4.35...
ONNX: export success ✅ 1.6s, saved as 'yolov8s.onnx' (42.7 MB)

Export complete (3.7s)
Results saved to /home/qtang/ultralytics
Predict:         yolo predict task=detect model=yolov8s.onnx imgsz=640
Validate:        yolo val task=detect model=yolov8s.onnx imgsz=640 data=coco.yaml
Visualize:       https://netron.app
(ultralytics) (npu-dev-env) qtang@gpux2:~/ultralytics$
输入图片
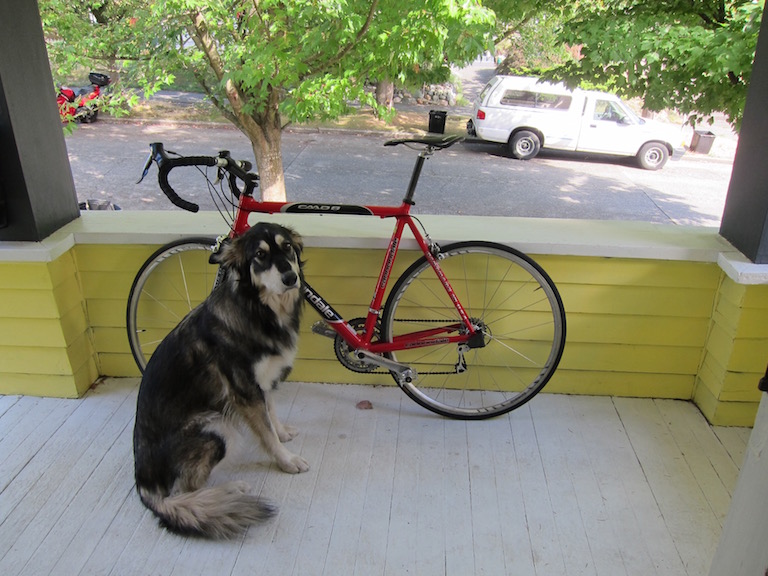
执行完成后将获得 yolov8s.onnx 模型以及使用测试图片 ssd_dog.jpg 的推理计算结果

5.3. 模型转换
5.3.1. ONNX 模型优化
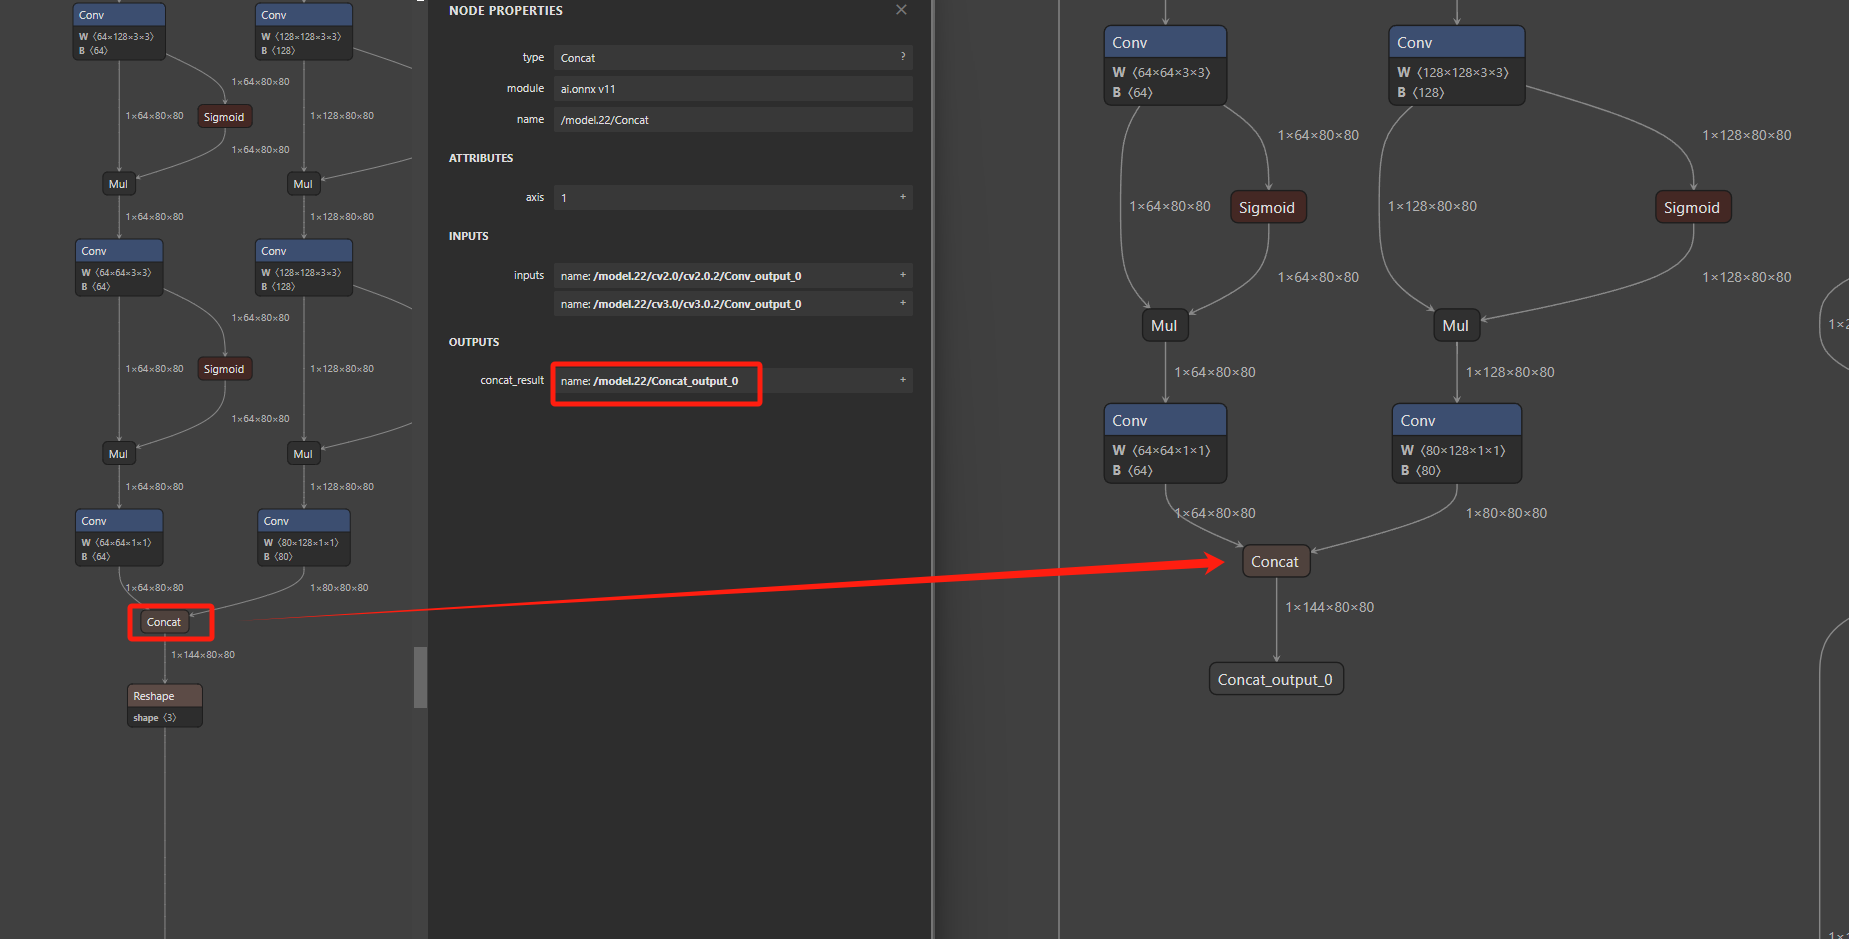
在使用 pulsar2 工具链转换之前,先对前一步获得的 yolov8s.onnx 模型进行必要的计算图优化,便于提高模型部署效率。
import onnx

input_path = "yolov8s.onnx"
output_path = "yolov8s-cut.onnx"
input_names = ["images"]
output_names = ["/model.22/Concat_output_0", "/model.22/Concat_1_output_0", "/model.22/Concat_2_output_0"]

onnx.utils.extract_model(input_path, output_path, input_names, output_names)
切图后的模型差异

5.3.2. Pulsar2 编译
Pulsar2 是新一代AI工具链,包含 模型转换、离线量化、模型编译、异构调度 四合一超强功能,进一步强化了网络模型高效部署的需求。在针对第三代、第四代 NPU 架构进行了深度定制优化的同时,也扩展了算子&模型支持的能力及范围,对 Transformer 结构的网络也有较好的支持。
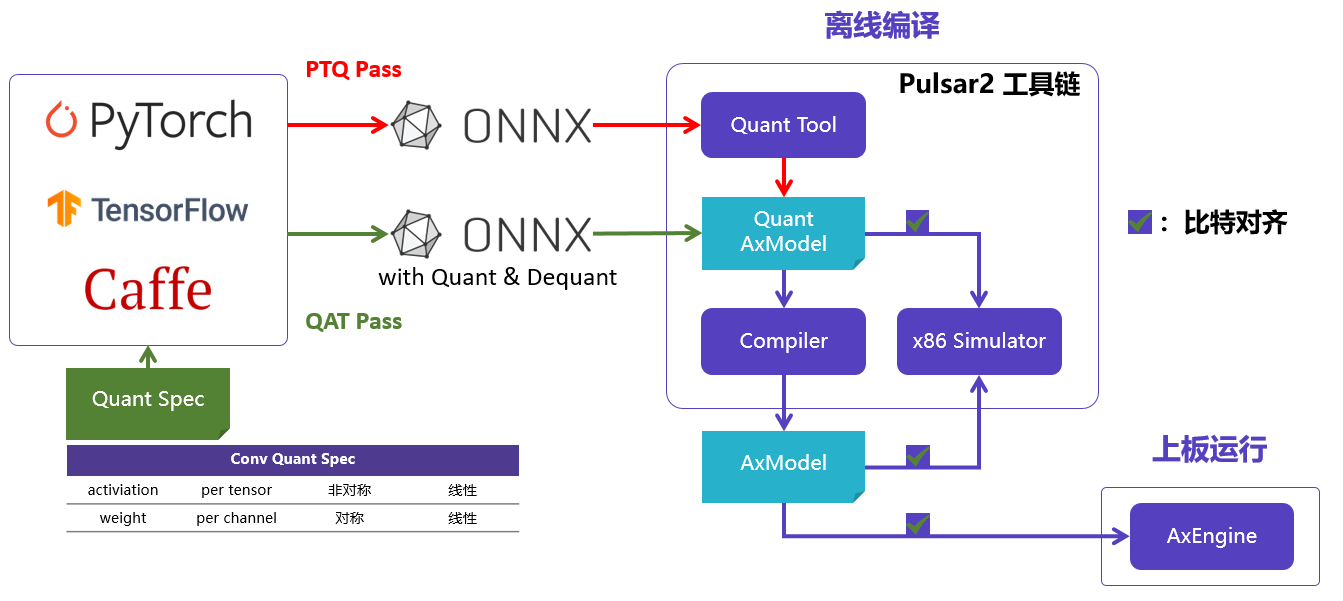
一键完成 图优化、离线量化、编译、对分功能。整个过程耗时不到5分钟,相比上一代工具链模型编译效率有了数量级的提升。默认已经搭建好了基于 Docker 的 Pulsar2 工具链使用环境。
| 文件名 | 描述 |
|---|---|
| yolov8s_config.json | 模型转换必要的配置文件 |
| yolov8s-cut.onnx | 待转换的 ONNX 模型 |
| coco_1000.tar | 模型转换 PTQ 依赖的量化校准数据集 |
配置文件 yolov8s_config.json,需要根据模型的输出节点进行修改,比如,以下配置文件中,需要将output_processors 中三个 tensor_name,修改为您根据文章内容得到的 yolov8s-cut.onnx 的模型的输出节点的名称,如下,我将其填充为 /model.22/Concat_output_0、/model.22/Concat_1_output_0、/model.22/Concat_2_output_0,此步骤的作用是在模型输出节点上加上一个 transpose 以适应 ax-samples 中的后处理代码,将输出节点的 shape 从
1*144*80*80
1*144*40*40
1*144*20*20
改为
1*80*80*144
1*40*40*144
1*20*20*144
yolov8s_config.json 如下所示
{
  "model_type": "ONNX",
  "npu_mode": "NPU1",
  "quant": {
    "input_configs": [
      {
        "tensor_name": "images",
        "calibration_dataset": "./dataset/coco_1000.tar",
        "calibration_size": 32,
        "calibration_mean": [0, 0, 0],
        "calibration_std": [255.0, 255.0, 255.0]
      }
    ],
    "calibration_method": "MSE",
    "precision_analysis": true,
    "precision_analysis_method":"EndToEnd"
  },
  "input_processors": [
    {
      "tensor_name": "images",
      "tensor_format": "BGR",
      "src_format": "BGR",
      "src_dtype": "U8",
      "src_layout": "NHWC"
    }
  ],
  "output_processors": [
    {
      "tensor_name": "/model.22/Concat_output_0",
      "dst_perm": [0, 2, 3, 1]
    },    {
      "tensor_name": "/model.22/Concat_1_output_0",
      "dst_perm": [0, 2, 3, 1]
    },    {
      "tensor_name": "/model.22/Concat_2_output_0",
      "dst_perm": [0, 2, 3, 1]
    }
  ],
  "compiler": {
    "check": 0
  }
}
转换命令如下
pulsar2 build --input yolov8s-cut.onnx --config yolov8s_config.json --output_dir output --output_name yolov8s.axmodel --target_hardware AX620E
转换完成之后,将在 ./output 路径下生成 yolov8s.axmodel 文件,该文件用于最终上板运行。
5.4. 上板示例
默认已完成 爱芯派Zero 开发板测试环境搭建,能通过 SSH 登录进控制台。上板示例运行依赖一下文件
| 文件名 | 描述 |
|---|---|
| ax_yolov8 | 基于 AX620Q 的 YOLOv8 DEMO,NPU 计算 |
| yolov8s.axmodel | 通过 pulsar2 转换生成的 axmodel |
| ssd_dog.jpg | 测试图片 |
ax_yolov8 请参考 ax-samples 项目编译获得。执行结果如下
root@ax620e:/root # ./ax_yolov8 -m yolov8s.axmodel -i ssd_dog.jpg
--------------------------------------
model file : yolov8s.axmodel
image file : ssd_dog.jpg
img_h, img_w : 640 640
--------------------------------------
Engine creating handle is done.
Engine creating context is done.
Engine get io info is done.
Engine alloc io is done.
Engine push input is done.
--------------------------------------
post process cost time:8.57 ms
--------------------------------------
Repeat 10 times, avg time 27.13 ms, max_time 27.14 ms, min_time 27.12 ms
--------------------------------------
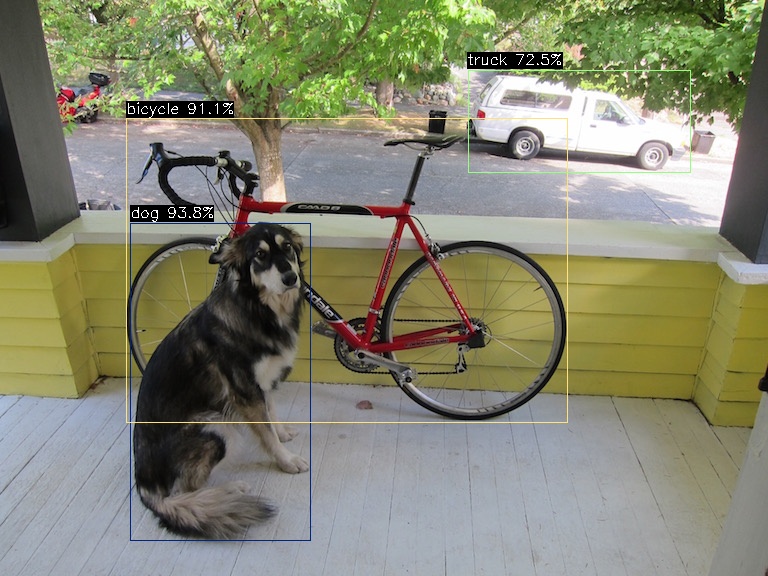
detection num: 3
16: 94%, [ 130, 223, 311, 541], dog
1: 91%, [ 126, 118, 569, 423], bicycle
7: 73%, [ 468, 70, 691, 173], truck
--------------------------------------
执行完成后在当前路径下会生成 yolov8s_out.jpg
5.5. 结束语
本章节会根据用户反馈不断更新和完善,毕竟基于 AX620Q 这类普惠AI芯片最常见的智能算法应用便是目标检测任务。
本文相关文件均可通过 百度网盘 获取
本文部署 YOLOv8 的方案也适用于 AX650A、AX650N、AX630C
更多的 AI 示例请参考我们在 Github 上的开源项目 ax_samples